| Note: This tutorial is only a very brief description of a sample network. Networking is a complex subject, but the newer operating systems make it a lot easier than in the past. Nevertheless, you should be prepared to make a tech support call or two if you've never setup a network. Also, take care in purchasing networking components to ensure compatibility. |
You will also need one node of PC MACLAN, available from Miramar Systems, of Santa Barbara, CA: http://www.miramarsys.com. If you have Windows 98 installed on your PC and you want to upgrade to the SE version to take advantage of ICS, Microsoft® was offering a $20.00 upgrade CD from their web site. I don't know if they are still making this offer, but it is worth checking into because this can be a substantial savings over the retail price of the operating system.
Although the configuration may vary in your situation (e.g. a dialup Internet connection using a 56k modem or a cable modem instead of a DSL line) I decided to use this configuration because it has worked for me. With only two computers it is possible to eliminate the Ethernet hub if you use a crossover cable, but without the hub you can't connect any other devices to the network (such as a network printer or even another computer).
Additionally, this tutorial is setup in three parts, a basic setup, a setup with ICS and a setup "with all the goodies" (scanner, printers and drawing pad). I'm presenting it this way to demonstrate that you can build your network a little at a time if you plan it right. With some forward thinking you can "grow" your network and expand it to suit your own needs.
Preliminaries
To begin with, the PC must be setup with Windows 98 SE with at least one functioning NIC. The newer Macintosh computers come with a network adapter already built-in. Once the network is setup and running on the PC all you have to do is cable it up and the Mac will see the network. Both the Mac and Windows operating systems include help files with hyperlinks to all the necessary assistants and wizards. Simply select the appropriate help subject from either table of contents.
Basic SetupShown below is the basic setup (click the image for a larger view).
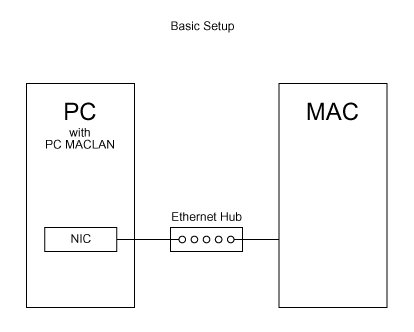
This is the most rudimentary setup for the Mac-Win network. Install PC MACLAN on the PC following the setup instructions provided with the software. In the Macintosh, turn on AppleTalk® in the AppleTalk control panel, then turn on file sharing in the File Sharing control panel. On the PC, setup the PC MACLAN Client to be able to see the Mac's drives, and then setup the PC MACLAN File Server for the Mac to be able to see the PC's drives. In the Windows Explorer, right-click a drive or folder and select "Sharing..." from the context menu to setup the drives and folders you want to make available to the Mac. At this point you want to make sure the network is functioning properly and you can share files without any problems.
On the Mac using OS 9, there are three control panels to make adjustments - the File Sharing control panel, the TCP/IP control panel and the AppleTalk control panel. In Windows, adjustments are made through the Network Neighborhood. PC MACLAN automatically sets up the Network Neighborhood properties on the PC, so it shouldn't be necessary to make any adjustments.
Basic Setup With ICSShown below is the basic setup with Internet Connection Sharing (click the image for a larger view).
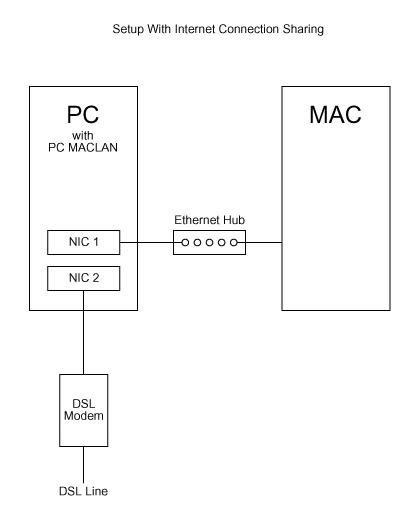
In this setup, two NICs are used in the PC - one for the DSL or cable modem and one for the rest of the network. This setup also allows you to isolate the network from the Internet by installing a firewall and configuring it so it is positioned between NICs 1 and 2. A firewall is a piece of software that will shield your network and provide protection from unauthorized access.
Setting up ICS in Windows is very straightforward. Microsoft provides all the necessary instructions with Windows 98 SE. Once ICS is setup on the PC as the host, setting up your Internet connection in the Mac is very simple. If you are setting up the Mac for the first time it will launch the Internet Setup Assistant and ask you how you want to connect to the Internet (you can run the Internet Setup Assistant at any time).
While running the Internet Setup Assistant, it will ask you about your TCP/IP settings. TCP/IP is the default network protocol for Windows 98 SE and is the universal protocol for the Internet. Choose Configure "Using DHCP Server" (Dynamic Host Configuration Protocol). Once you have done this, it will access the host PC (running ICS) which will then assign an IP address to the Mac. An IP address (IP = Internet Protocol) is a number that is used to identify your computer (every computer on the Internet has an IP address). An IP address always appears in a format like 255.255.255.255. The IP address assigned by the host to the Mac may look something like 192.168.0.2.
When you have finished running the Internet Setup Assistant you simply launch your browser (and cross your fingers) and you should be able to browse the Internet. You can adjust your TCP/IP settings in the TCP/IP control panel, but with DHCP this shouldn't be necessary..
Setup With All The GoodiesShown below is the setup with all the goodies (scanner, printers, drawing pad) (click the image for a larger view).
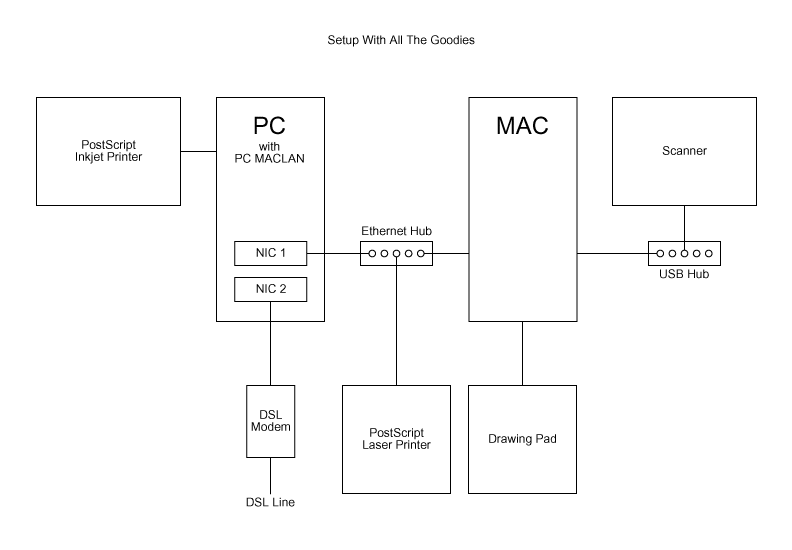
This setup is more how a graphic artist or web designer would want. Here you have a scanner, a PostScript® laser printer for B & W proofs and color separations (and finished shooting art if it supports a high enough resolution), a color inkjet printer with a PostScript driver for color proofing and composite color printing and a drawing pad. In my own personal setup I have a Hewlett Packard® Laserjet® 4000N workgroup printer, an Epson® Stylus® Color 850 inkjet printer with the Epson StylusRIP PostScript driver and a Wacom® Intuos™ drawing pad.
In my setup, the inkjet printer is a local printer on the PC using the built-in parallel port. Although I could have setup the HP 4000N as a local printer as well, I would have had to add another parallel port. It made more sense to cable it to the network and use TCP/IP for printing. The HP printer comes with Mac and Windows drivers on a dual-formatted CD. Setting up the laser printer was very simple for both computers. The Mac found it right away.
PC MACLAN supports printer sharing, but with this setup you don't have to. The laser printer is cabled to the network and bypasses printer sharing (it isn't cabled to either computer so it doesn't have to be "shared"). The Epson StylusRIP PostScript driver works by first making a PostScript file (.PS or .PRN file) for the print job. Then you save the file into a temporary folder where StylusRIP looks for the job to print. It starts a print job anytime a PostScript file is dropped into that folder. With this setup, only file sharing is necessary to print to the inkjet printer from the Mac, not printer sharing.
Since I first setup my network, Adobe has released PressReady™, a PostScript driver which supports a number of inkjet printers. Using PressReady instead of StylusRIP in this setup should also work equally well, if not better.
Although the scanner is shown connected to the Mac, it can also be connected to the PC. It just depends on which computer has the scanner driver or SCSI adapter (if the scanner uses a SCSI interface). In the above setup, the scanner is connected to the Mac via a USB hub (Universal Serial Bus). The Mac comes with two USB ports, and the hub may or may not be necessary in your situation.
The biggest advantage to setting up a peer-to-peer network is the ability to share resources. This can save money because you don't have to duplicate peripherals. Another advantage is that you can distribute files and functions across the network and relieve overloaded computers and hard drives. Anyone who has ever setup a single PC with a scanner, a tape drive and an internal modem knows what I mean. Most, if not all of your expansion slots get eaten up in the process. The computer soon runs out of slots or other resources prohibiting you from adding any more devices. The advent of USB does make things easier, but many businesses still have older PCs or peripherals that don't have USB support. Networking makes a lot of sense. Cross-platform networking makes even more sense for graphic artists, web designers and service bureaus.
Below you will find a link to a PDF file with the setups shown on this web page.
|
| Download PDF File 6.2K | Download Adobe Acrobat Reader FREE |


0 Reactions to this post
Add CommentPost a Comment